FlowIllustrator
FlowIllustrator is a novel tool to create expressive and meaningful flow illustrations in a simple point-and-click fashion. It implements the Data-Guided Flow Illustration paradigm, and provides several flow templates. FlowIllustrator is developed in C++ for 64 bit Windows platforms. Using OpenGL as the basis of its rendering system, it can rely on a fast and flexible rendering API. FlowIllustrator is available as an open source tool, and you can find the latest release in the download section.The user interface
FlowIllustrator's user interface consists of three main parts:- The ribbon bar in the top,
- the object browser on the right, and
- the workspace in the center.
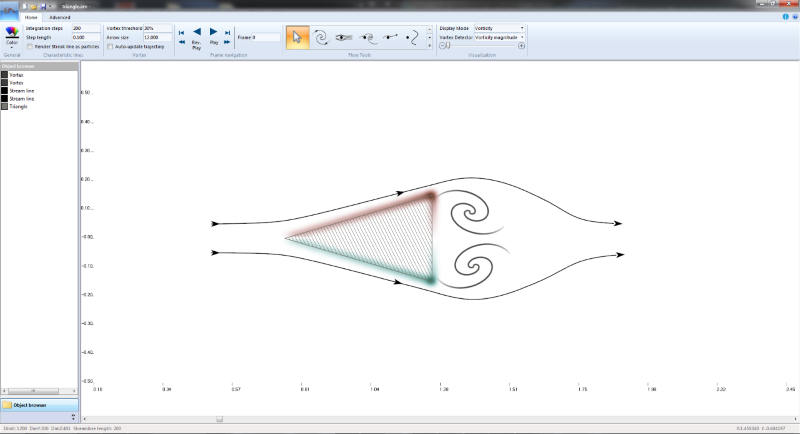
- FlowIllustrator's user interface.
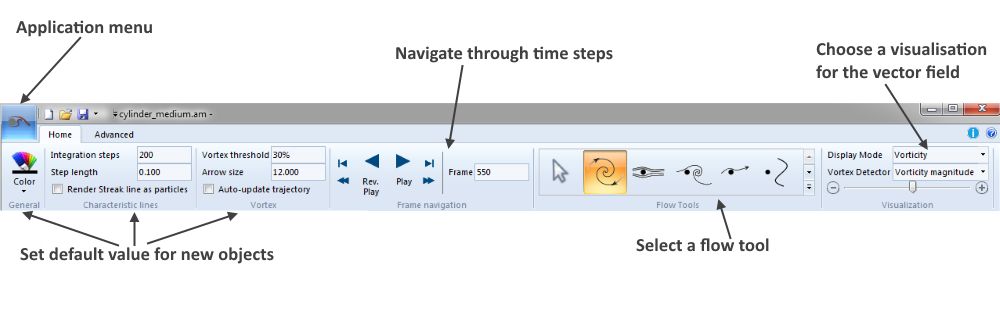
- The ribbon bar, home category.
Open & save files
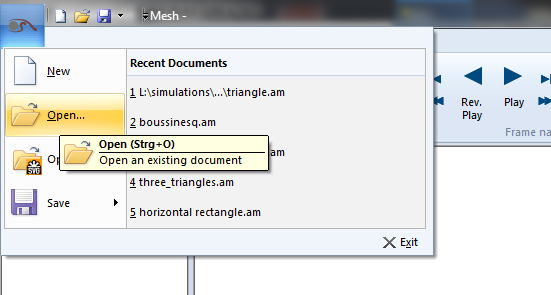
Opening files is straight forward. Just klick the blue application button in the upper left corner and select Open from the menu. In the upcomming Open file dialogue select the desired vector field. Please keep in mind, that FlowIllustrator currently only allows to open files in the Amira mesh format (*.am).
 |
 |
Saving files, in principle, is a straight forward as opening a file. However, FlowIllustrator provides are a few more options to save a file.Selecting Save from the application menu allows you to:
- Save your illustration as *.SVG file,
- save your illustration as *.PNG file,
- save a series of *.PNG files, and
- save the vector field in a seperate *.AM file.
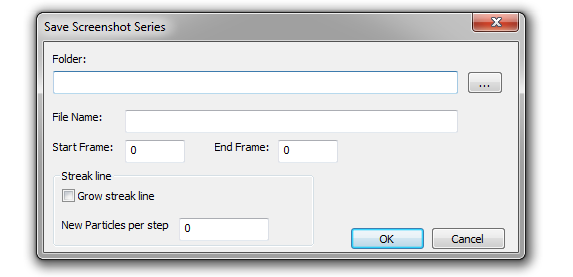 Alternatively, the Save Screenshot Series dialogue provides the possibility to grow streak lines, as it advances
through the specified range of frames. Therefore each streak lines in the current illustration is
grown by the specified amount of particles for each time step.
This however, can take a very long time, especially if streak lines consist of a few thousand particles.
Last but not least, FlowIllustrator allows to save a copy of the currently opened vector field. Moreover,
it allows to only save a part of the spatial as well as the temporal domain. This can be useful for creating
smaller files, since flow fields can easily take up several gigabytes of memory.
Alternatively, the Save Screenshot Series dialogue provides the possibility to grow streak lines, as it advances
through the specified range of frames. Therefore each streak lines in the current illustration is
grown by the specified amount of particles for each time step.
This however, can take a very long time, especially if streak lines consist of a few thousand particles.
Last but not least, FlowIllustrator allows to save a copy of the currently opened vector field. Moreover,
it allows to only save a part of the spatial as well as the temporal domain. This can be useful for creating
smaller files, since flow fields can easily take up several gigabytes of memory.
Display functions
Flow illustrator provides several methods to visualise a vector field, in order to aid the process of creating a flow illustratoin. These so-called display methods can be selected in the display methds dropdown menu in the main ribbon category. Following, the available display methods are briefly described.
Colour coding

The colour for each pixel is chosen from the HSV colour space, based on the angle of a vector, with respect to the horizontal axis.
Vorticity


-
For each pixel location the vorticity is calculated and normalised to the range [-1 .. 1]. Positive vorticity values are normalised using the maximum vorticity in the currently displayed time step, while negative vorticity values are normalised using the minimum vorticity value. These normalised vorticity values are then used to choose acolour from the HSV colour space.
Vector magnitude

The normalised vector magnitude is used to choose a colour from the HSV colour space.
Derivatives


LIC

-
Line Integral Convolution (LIC) is implemented, according to the fast LIC approach by Stalling and Hege. LIC is especially useful to find interesting stream line structures.
Mouse and keyboard
FlowIllustrator tries to keep user interactions as simple as possible. In fact, the most important actions can be performed using the mouse only. For example, placing templates in the workspace, selecting objects or dragging selected object over the workspace can be done by only using the left mouse button.
Selecting objects in the workspace
Selecting objects (flow templates) in the work space can be done in various ways:
- You can use the Windows-shortcut CTRL-A to select all obejcts in the workspace.
- You can click on an object in the object browser on the left side of the application window. By holding the STRG-key pressed, you can select multiple objects.
- In select mode, you can click on an object in the work space. By holding the STRG-key pressed, you can select multiple objects.
- In Select mode, you can click in an empty region of the workspace, kepp the mouse-button pressed, and draw a selection rectangle. Each flow template intersected by this rectangle will then be selected, as soon as the mouse-button is released.
Manipulating Objects
Once an object is selected, you can modify it and adjust its apearance. Each selected object is drawn with a surrounding rectangle. This rectangle marks an objects bounding box and comes with six modiy-handles. These handles are placed on each corner of the bounding box, as well as in the middle of each of its four edges. These handles can be used to adjust the size of a selected flow template. If you press the SHIFT-key while manipulating these handles, a template will maintain its current center location, and adjust its size accordingly. By klicking inside the bounding box of a selected flow template and keeping the mouse-button pressed, one can drag a flow template acrtoss the workspace. If however, the CTRL-key is being pressed, while clicking inside a templates bounding box, one can rotate a selected object about its center. For each type of selected object, a specialised context category is shown in the ribbon bar. These context categories allow to modify all parameters of selected object. By allowing to enter specific values, this usually gives the user the ability to tune an illustration in a very precise way.
The mouse-wheel
The mouse wheel has two main functionalities.- Zooming.
- Altering default values of new objects.
By pressing the CTRL-key while rotating the mouse-wheel, one can zoom in/out the currnet flow field. If the doamin of the current flow field should exceed the screen area, scroll bars allow to navigate through the domain.
Rotating the mouse-wheel whithout pressign the CTRL-key modyfies a default values, depending on the currently selected flow tool. If, e.g. the vortex tool is selected, this will aterate the threshold used to measure a vortex. If, on the oterh hand a characteristic curve tool is selcted, this will change the amount of integration steps performed to create e.g. a new stream line.
Copy and paste
FlowIllustrator supports copying and pasting flow templates. This can be done by either selecting objects and then using the common CTRL-C and CTRL-V shortcuts, or using the context menu, which pops up when clicking the right mouse-button inside the workspace. If only a single object is to be copied, by using the context-menu method, the new copy of the object will be palced at the location of the mouse click. All other methods, will placte the new obejcts the the exact locations of their original version, and then select only the new objects.